Hey there!
When you hear someone talk about nail stamping, do you break out in a sweat? Does your heart race at the thought of having to scrape polish correctly? Do you run screaming from the sight of a nail plate?
Fear not. Nail stamping is fun, and yes, it's actually easy with a little bit of guidance.
I'm going to put together a post with tips to help you get over your stamping fears and issues, and it would help me to know what sorts of issues you have with stamping. What have you struggled with in the past? What are your fears, if you've never tried it? What sort of stamping would you like to be able to do, but don't seem to be able to get right?
I'm by no means *the* expert on stamping, far from it, but I've been doing it for over a year now and I've picked up a few tricks of the trade along the way that I'd love to share them with you. So please let me know your stamping questions are in the comment section below; based on your questions and anything else I think will be useful, I'll put together a post or a series of posts (depending on how long it needs to be), to try to get you over those issues and on your way to stamping bliss. :)
Hugs and smooches!
M.
Sunday, June 30, 2013
Saturday, June 29, 2013
Before & After: You can stamp with InDecisive Nail Lacquer's Ichor line!
Hello!
Omg omg omg, so excited so excited!
Back when I did my review of InDecisive Nail Lacquer's temperature-changing Ichor line, my lovely friend Charis asked me if it was possible to stamp with the polishes, because how cool would it be to have stamping that comes and goes when you're in warm vs. cool temperatures? I said I thought it wouldn't because 2 coats of the polish are recommended...but I was so very wrong!!
To warn you, I was playing around trying this out, so this manicure isn't perfect. First off, my break finally grew out to the point where I could cut it off without taking off part of my fingertip, so I'm in a strange nail place with crazy nubbins (because I can't file the others down any farther than you see because the nail bed on them is too long). And, well...there's cat hair. And some smudging. But I had to share it with you quickly because this is so flippin' fun!!
I was trying out a new polish I just got, Barielle's Green Apple Chew, which is a bright (almost neon but not quite) light-yellowish-green-apple creme:

I wanted to do a simple manicure that would be cute on its own when the Ichor didn't show, but I wanted there to be a surprising contrast in the design with the Ichor when it did show. So, I freehanded a white heart (Sally Hansen White On) to be a pretty accent nail against the green, with a nice, sweet happy lovey-dovey sort of feel. Then I stamped Ichor over it using Bundle Monster 316, to give it a different type of feel...
Here is what the mani looks like when the Ichor doesn't show (when your hands are warm; in this case I ran warm water over it, hence the droplets, hee hee):
And here is what it looks like when your hands are cold:
.JPG)
How. Cool. Is. That.
If you look back at the first picture, you can see that with the warm water method, the Ichor didn't disappear completely, you can still see it a bit when you look carefully (but you do have to look at it closely--you can't even see it at arm's length). I did this at night, so tomorrow I'll take it out to play in the warm sun, and see if it goes away completely then.
So far I've only tried this with black, but I can't imagine why the other colors wouldn't work as well. The little girl in me that loved to play with invisible ink is so incredibly happy and excited right now, I can't even describe it...:)
Thanks for looking! Hope you are having a wonderful weekend. :)
M.
Omg omg omg, so excited so excited!
Back when I did my review of InDecisive Nail Lacquer's temperature-changing Ichor line, my lovely friend Charis asked me if it was possible to stamp with the polishes, because how cool would it be to have stamping that comes and goes when you're in warm vs. cool temperatures? I said I thought it wouldn't because 2 coats of the polish are recommended...but I was so very wrong!!
To warn you, I was playing around trying this out, so this manicure isn't perfect. First off, my break finally grew out to the point where I could cut it off without taking off part of my fingertip, so I'm in a strange nail place with crazy nubbins (because I can't file the others down any farther than you see because the nail bed on them is too long). And, well...there's cat hair. And some smudging. But I had to share it with you quickly because this is so flippin' fun!!
I was trying out a new polish I just got, Barielle's Green Apple Chew, which is a bright (almost neon but not quite) light-yellowish-green-apple creme:
.JPG) |
| Barielle Green Apple Chew, direct sunlight |

I wanted to do a simple manicure that would be cute on its own when the Ichor didn't show, but I wanted there to be a surprising contrast in the design with the Ichor when it did show. So, I freehanded a white heart (Sally Hansen White On) to be a pretty accent nail against the green, with a nice, sweet happy lovey-dovey sort of feel. Then I stamped Ichor over it using Bundle Monster 316, to give it a different type of feel...
Here is what the mani looks like when the Ichor doesn't show (when your hands are warm; in this case I ran warm water over it, hence the droplets, hee hee):
 |
| Ichor is clear when warm |
And here is what it looks like when your hands are cold:
.JPG) |
| Ichor black when cold. :) |
.JPG)
How. Cool. Is. That.
If you look back at the first picture, you can see that with the warm water method, the Ichor didn't disappear completely, you can still see it a bit when you look carefully (but you do have to look at it closely--you can't even see it at arm's length). I did this at night, so tomorrow I'll take it out to play in the warm sun, and see if it goes away completely then.
So far I've only tried this with black, but I can't imagine why the other colors wouldn't work as well. The little girl in me that loved to play with invisible ink is so incredibly happy and excited right now, I can't even describe it...:)
Thanks for looking! Hope you are having a wonderful weekend. :)
M.
Before & After: Arr, Matey, yer mani is a FAIL
Hello everyone!
It's been a while since I did a Cheeky Twin Post with Dina of Secretary's Nail Art because the stars haven't really aligned well recently, but we're back on track, and today we're working with the ship image from Cheeky 49.
I have to warn you now that I am not pleased with what I put together. ::sad face::
I started out with a polish that I was/am pleased with...Zoya Meg, a pretty fleck-finish avocado green:
I thought I'd do a bit of a skittle thing with it, so I stamped the cutlass image from the same plate on the index and pinkie, using Barielle Green Apple Chew. On the middle and ring finger, I put a coat of Sation Go-Glitter Girl, a beautiful glitter topcoat with teal shards, teeny green hexes and silver and white small hexes; I thought this would give a sort of an ocean-y feel. Then, I stamped the ship over the top of the glitter with Konad Black, to represent my pirate fleet cruising the ocean:
Even putting aside the wound I sustained on the side of my finger, I am just underwhelmed by this. It's not horrible or anything, but it's not great. I think maybe it would have been better if I'd put the glitter on all the nails? I don't know...sigh.
Anyway, don't forget to check out Dina's mani over on her blog; I just saw it and it's way cute!! And we used similar colors, I think that's the first time that has happened, lol! :)
Big hugs,
M.
It's been a while since I did a Cheeky Twin Post with Dina of Secretary's Nail Art because the stars haven't really aligned well recently, but we're back on track, and today we're working with the ship image from Cheeky 49.
I have to warn you now that I am not pleased with what I put together. ::sad face::
I started out with a polish that I was/am pleased with...Zoya Meg, a pretty fleck-finish avocado green:
.JPG) |
| Zoya Meg, indirect sunlight |
 |
| Zoya Meg, indirect light |
I thought I'd do a bit of a skittle thing with it, so I stamped the cutlass image from the same plate on the index and pinkie, using Barielle Green Apple Chew. On the middle and ring finger, I put a coat of Sation Go-Glitter Girl, a beautiful glitter topcoat with teal shards, teeny green hexes and silver and white small hexes; I thought this would give a sort of an ocean-y feel. Then, I stamped the ship over the top of the glitter with Konad Black, to represent my pirate fleet cruising the ocean:
.JPG) |
| Just sit right back and we'll hear a tale... |
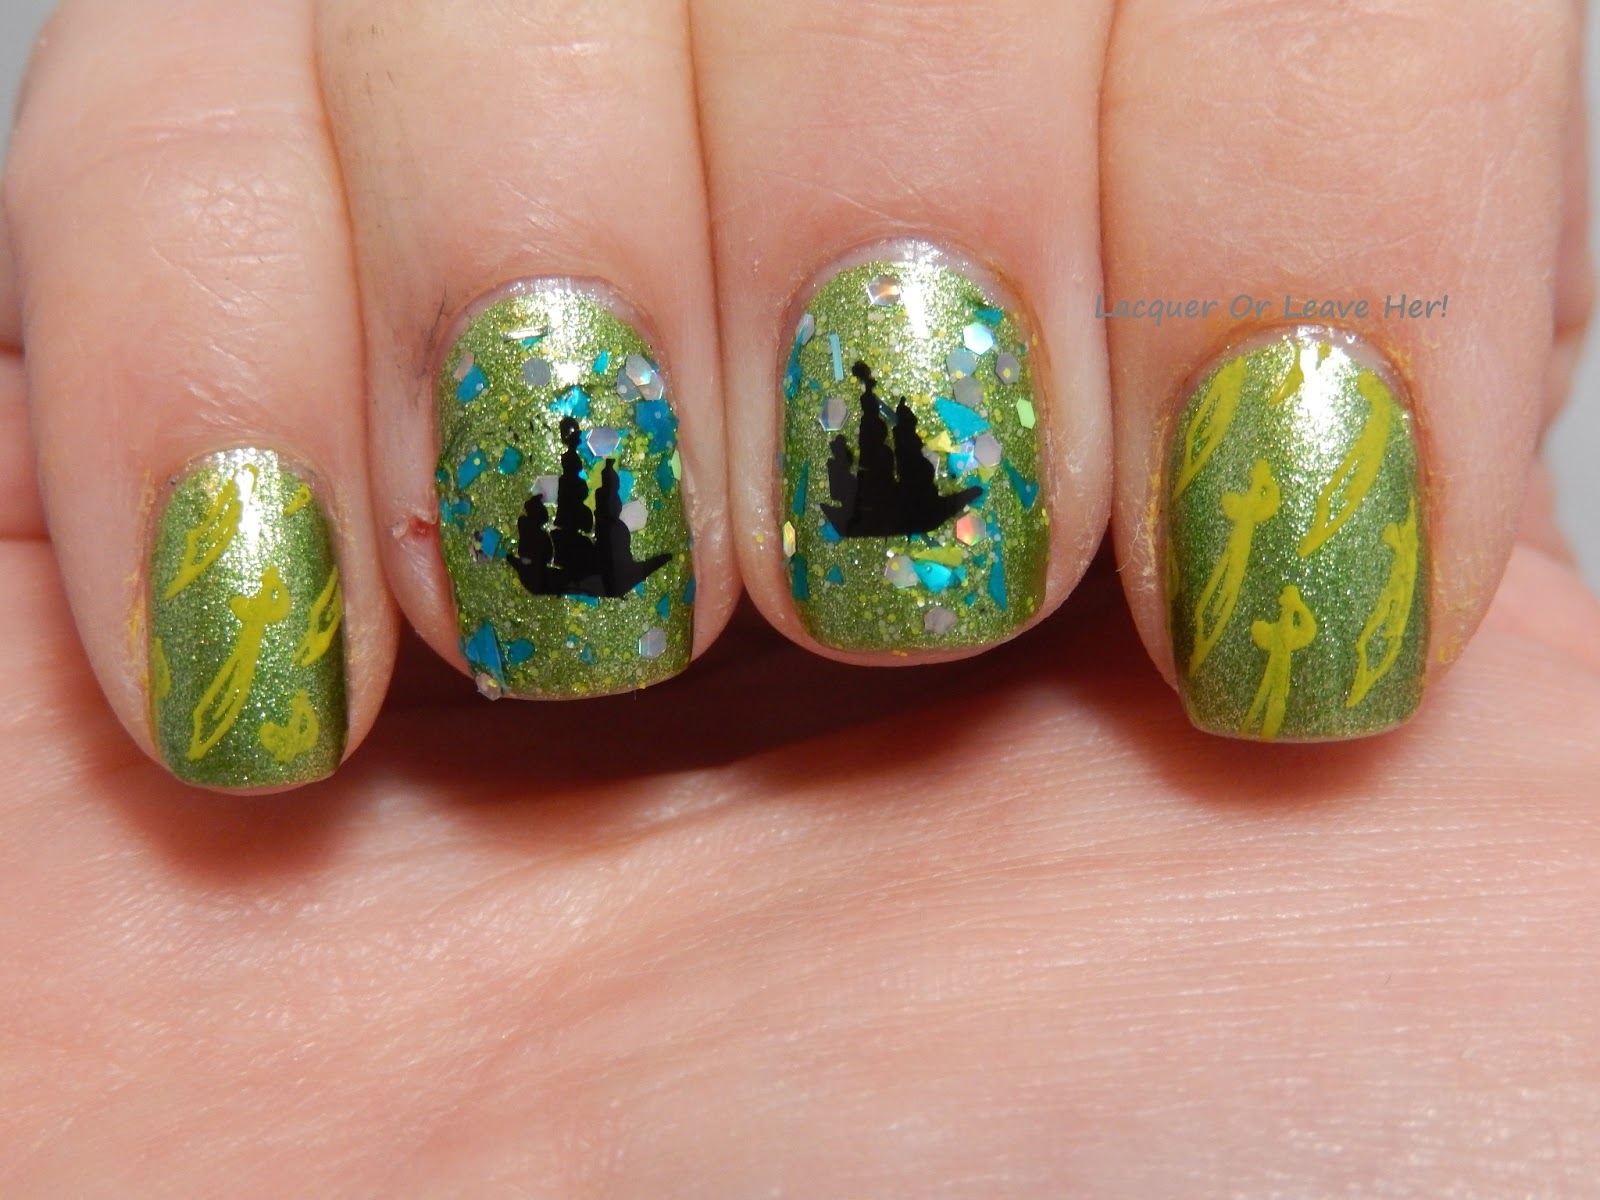 |
| A tale of a fateful trip... |
Even putting aside the wound I sustained on the side of my finger, I am just underwhelmed by this. It's not horrible or anything, but it's not great. I think maybe it would have been better if I'd put the glitter on all the nails? I don't know...sigh.
Anyway, don't forget to check out Dina's mani over on her blog; I just saw it and it's way cute!! And we used similar colors, I think that's the first time that has happened, lol! :)
Big hugs,
M.
Friday, June 28, 2013
Before & After: Strawberry Fields Forever
Hello!
Today I have a manicure I did for this week's theme in my Hobby Polish Blogger's group: Favorite Summer Fruit. I love all types of fruit, but I always look forward to the strawberry harvests in the spring and summer, so I decided to go with that. :)
I started with one of my favorite new polishes, Lucky 13 Strawberry Girl (how could I not?). Strawberry girl is a juicy red jelly with green glitter hexes that look like seeds and green shards that look like bits of leaves:

I personally think this polish looks like strawberries as is, with no nail art, but what fun would that be?? So I pulled out my acrylics and painted some leaves on the tops of my strawberries:
.JPG)
.JPG)

Now I want to have strawberry shortcake...please excuse me while I go nom nom nom...:)
Please check out the other favorite fruits, linked below. :)
Hugs and love,
M.
Today I have a manicure I did for this week's theme in my Hobby Polish Blogger's group: Favorite Summer Fruit. I love all types of fruit, but I always look forward to the strawberry harvests in the spring and summer, so I decided to go with that. :)
I started with one of my favorite new polishes, Lucky 13 Strawberry Girl (how could I not?). Strawberry girl is a juicy red jelly with green glitter hexes that look like seeds and green shards that look like bits of leaves:
.JPG) |
| Lucky 13 Lacquer Strawberry Girl, direct overcast light |

I personally think this polish looks like strawberries as is, with no nail art, but what fun would that be?? So I pulled out my acrylics and painted some leaves on the tops of my strawberries:
.JPG)
.JPG)

Now I want to have strawberry shortcake...please excuse me while I go nom nom nom...:)
Please check out the other favorite fruits, linked below. :)
Hugs and love,
M.
Thursday, June 27, 2013
Question for you...
...Would any of you be interested in a post about ways to find deals on polishes? I don't want to do a post or series of posts on this if it's not really of interest, but I'm sort of a bargain hunter, so I thought I would ask and see...
Review: Born Pretty Store Striping Tape
Hello!
I've done tons of striping manicures on this blog, and I own a bunch of nail tape. But much to my amazement, I realized a while back that I didn't have a roll of red tape; I bought the tape I have in a set where I didn't get to pick the colors I wanted. So when Born Pretty Store Born Pretty Store asked if there were items I wanted to review, I thought this would be a good opportunity to try out Born Pretty Store's striping tape.
Here is how the tape comes packaged; it comes in its own plastic envelope. As you can see, there is a lot of tape here; you'd have to work hard to run out of it unless you're doing a new striping manicure every day:
.JPG)
I use this sort of nail tape primarily for two types of manicures. I use the tape as an accent on the nail itself, and I use it like painter's tape, to delineate patterns or areas of a design that will show after the tape is removed. I'm going to test out the tape in both of these types of manicures.
I did the first manicure for an Adventures In Stamping theme that involved stamping dragonflies or butterflies; I had an idea that I wanted to try out with Barry M Chameleon Blue, which switches from blue to purple when you put a topcoat on it. I thought it would be cool to have half of the nail in one color and half in the other, with different stamping on the halves--and what's a more perfect way to divide those halves than red striping tape, since red and blue makes purple? I stamped with Barry M Silver Foil on the blue half, and with Chameleon Blue itself on the red half (it's a great stamping polish). I stamped overlapping the tape so it would look like the dragonflies were hovering above the design (well, that was the plan, lol):
.JPG)
.JPG)
This is a rigorous test of the striping tape because I wasn't able to cover the tape up with topcoat--if I did, it would have changed the color of the polish underneath. I took this picture the day after I did the manicure, after sleeping with the tape on. As you can see, there is just the teensiest bit of peeling starting at the tip of the nail, and none at all at the cuticle end. I've had other nail tapes that don't stay put that well even when I have them slathered in topcoat. :)
I also decided the next day that I wanted to change up the design a bit, so I redid two of the nails, but left the middle and ring untouched:
.JPG)
This was taken at the end of the second day, and you can see there is a tiny bit more peeling, but still remarkably little considering there was no topcoat over it and it had gone through a fair amount of abuse at that point. If you're looking for a striping tape that will stay where you put it, this one will have some staying power for you.
I also wanted to test the tape out to see how well it performs when used as a tool for masking designs. In this manicure, I started with a base of Zoya Logan and Ivanka (Logan on the pinkie and middle, Ivanka on the ring and index), and used tape to create a design on the nail. I then sponged over the nail and the tape with a gradient of Barry M Silver Foil and Gold Foil (although it didn't turn out to be very noticeable in the pictures, it's there if you look carefully :) ), and removed the tape. I finished the design with some rectangular rhinestones:
.JPG)

The lines are crisp, the tape stuck well and didn't allow leakage underneath, but also came up easily and didn't pull the polish when I took it off. When I was working with it, it stayed put and that made it easy for me to trim the ends and place the next pieces accurately.
Overall, I found this tape as easy to work with as any other I've tried, in fact a bit more. It was also impressively durable, and I like that you can pick individual colors rather than have to be stuck with a bunch of colors you may not like.
If you'd like to order this or any other products from their store, I have a coupon for 10% off that you can use:

This is not an affiliate link and I don't make any money when/if you use it. However, if the code is used 10 times, Born Pretty Store will sponsor a giveaway on my blog, which means free products for you. :)
Thanks for looking! I hope you're having a good week. :)
Hugs and love,
M.
(The nail tape used in this post was provided for my honest review.)
I've done tons of striping manicures on this blog, and I own a bunch of nail tape. But much to my amazement, I realized a while back that I didn't have a roll of red tape; I bought the tape I have in a set where I didn't get to pick the colors I wanted. So when Born Pretty Store Born Pretty Store asked if there were items I wanted to review, I thought this would be a good opportunity to try out Born Pretty Store's striping tape.
Here is how the tape comes packaged; it comes in its own plastic envelope. As you can see, there is a lot of tape here; you'd have to work hard to run out of it unless you're doing a new striping manicure every day:
.JPG)
 |
| Here's a close-up on the color |
I did the first manicure for an Adventures In Stamping theme that involved stamping dragonflies or butterflies; I had an idea that I wanted to try out with Barry M Chameleon Blue, which switches from blue to purple when you put a topcoat on it. I thought it would be cool to have half of the nail in one color and half in the other, with different stamping on the halves--and what's a more perfect way to divide those halves than red striping tape, since red and blue makes purple? I stamped with Barry M Silver Foil on the blue half, and with Chameleon Blue itself on the red half (it's a great stamping polish). I stamped overlapping the tape so it would look like the dragonflies were hovering above the design (well, that was the plan, lol):
.JPG)
.JPG)
I also decided the next day that I wanted to change up the design a bit, so I redid two of the nails, but left the middle and ring untouched:
.JPG)
This was taken at the end of the second day, and you can see there is a tiny bit more peeling, but still remarkably little considering there was no topcoat over it and it had gone through a fair amount of abuse at that point. If you're looking for a striping tape that will stay where you put it, this one will have some staying power for you.
I also wanted to test the tape out to see how well it performs when used as a tool for masking designs. In this manicure, I started with a base of Zoya Logan and Ivanka (Logan on the pinkie and middle, Ivanka on the ring and index), and used tape to create a design on the nail. I then sponged over the nail and the tape with a gradient of Barry M Silver Foil and Gold Foil (although it didn't turn out to be very noticeable in the pictures, it's there if you look carefully :) ), and removed the tape. I finished the design with some rectangular rhinestones:
.JPG)

The lines are crisp, the tape stuck well and didn't allow leakage underneath, but also came up easily and didn't pull the polish when I took it off. When I was working with it, it stayed put and that made it easy for me to trim the ends and place the next pieces accurately.
Overall, I found this tape as easy to work with as any other I've tried, in fact a bit more. It was also impressively durable, and I like that you can pick individual colors rather than have to be stuck with a bunch of colors you may not like.
If you'd like to order this or any other products from their store, I have a coupon for 10% off that you can use:
This is not an affiliate link and I don't make any money when/if you use it. However, if the code is used 10 times, Born Pretty Store will sponsor a giveaway on my blog, which means free products for you. :)
Thanks for looking! I hope you're having a good week. :)
Hugs and love,
M.
(The nail tape used in this post was provided for my honest review.)
Wednesday, June 26, 2013
Before & After: Miami Neon Vice
(Contains affiliate links)
Hello--
This hasn't been a good week, and today hasn't been much of a good day. I sort of just wanted the day to be over so I thought I'd write up with post in the morning, but I can't sleep, so I figured I'd write up the post now--nothing like some pretty polish to cheer a girl up. Especially when it involves a gorgeous, office-wear holo. :)
Today's manicure is a combination of two challenge manis in one; this is the fourth week of my Nail Challenge Collaborative's neon theme, and it's 1980s week in my Llama Nails group. I didn't intent to combine these themes, but how could I not--what's more 80s than neon??
Plus, my lemming nail mail came, and I had a polish I just couldn't resist using...so all the stars aligned, and here it be.
But I'm getting ahead of myself! First, I started with a base of Ruby White Tips polish Kim, which I got as a thank-you from Laura, the owner, because there was a delay with my order. It was a very sweet surprise which she did NOT have to do, and it just goes to show how amazing her customer service is! Kim is a barely-pink taupe color with a subtle scattered holographic sparkle:
.JPG) |
| Ruby White Tips Kim, artificial light |
 |
| Ruby White Tips Kim, artificial light |
This polish is like the secretary that has a little secret--that touch of a wild side she keeps hidden at work. In inside light, this is a perfect office-wear polish; the holo goes away and you have a lovely neutral shade. When you go outside or into other types of artificial light, you get that small little glimmer of holo happy that changes it up and makes it fresh and pretty. And while regular taupes can be boring even with toppers, the pink lean to this makes it a great polish to layer under fun polishes; let me show you what I mean...
That lemming I mentioned earlier? It was a general lemming sort of thing, I've been dying to get my hands on one of those matte-neon clear-based toppers. I fell in love with Wicked Polish's Hung Over The Rainbow, but haven't been able to get my hands on it. So when I was shopping Llarowe's restock the other day getting the new a-Englands, I happened to notice that Lush Lacquer Clowning Around also restocked and I grabbed it up. Look at how pretty it looks over Kim:
.JPG) |
| Lush Lacquer Clowning Around over RWT Kim, direct sunlight |
.JPG)
 |
| Lush Lacquer Clowning Around over RWT Kim, indirect sunlight |
This is one of those polishes I think everyone should own, in some form. I was worried it would be too bright or too neony, but it isn't--it's just the right of amount of happy and smiles in a jar. The kind of thing that just makes your day a little brighter when you need it to. :) This was so pretty I wore it like this for a day by itself.
Yes, that's all well and good as it is, but for a 1980s theme? Not nearly over the top enough. So to build on my Miami-Vice neutral pastel and my 1980s neon glitter, I stamped a 1980s pattern over them, using Pueen 05 (click here to see my review of this collection) and a variety of bright Sally Hansen polishes (Brisk Blue, Lickety-Split Lime, Orange Impulse, Lightning):
.JPG) |
| I wear my sunglasses at night |
.JPG) |
| So I can so I can... |
.JPG) |
| Not be blinded by this crazy manicure! |
.JPG)
I think it's safe to say that's pretty darn 80s. It might even out-80s the 80s, lol...But I'm pretty sure my friend had a sweater that looked just like one of those nails...Right around the same time my boyfriend was looking fine in his parachute pants. Wait, I mean...I'm clearly too young to have lived during that time...I saw it on a tv show! Yeah, that's the ticket! >.<
Thanks for reading, and please check out the other manis linked below. :)
Big hugs,
M.
Tuesday, June 25, 2013
Review: Cheeky Jumbo Plate 5 (Musical Nails)
(Purchased by me; affiliate links)
Hello!!
It's that time again, time for my review of Cheeky Jumbo Plate 5! This one's theme is 'Musical Nails', and as usual, I have made a video of my review, if you prefer to see it that way. This one is particularly silly, so I apologize in advance, lol. :)
The format of this one is the same as the previous 4; the top third of the plate is small individual images, and the bottom two-thirds is full-nail images. I have tried to get rid of the overlap in these pictures (although there is still a little bit), which I will present to you now:
 |
| That weird eye is just the funkiest thing ever, I looove it |
 |
| Sending out a Woo Hoo! to all my Woo Hoo! girls! |
 |
| Rocking it guitar or cassette style |
 |
| That star-face thing is very Woodstock |
 |
| Something for all your megaphone stamping needs |
 |
| Band Geek Chic FTW |
 |
| Love love love that old-time microphone |
 |
| I personally prefer my megaphones to come with their own tongues. Who doesn't? |
 |
| Those leafy things are sooo pretty, and I'm gonna make Halloween googly eyeballs with the other one... |
 |
| The right reminds me of watch links |
 |
| Circles within circles within circles, oh my! |
 |
| I love the paper-clip looking one! |
 |
| Musical notes--pretty |
 |
| Space seaweed!!!! |
 |
| Lucy In The Sky With Diamonds...ahhhhhhhhhhhhhhh.... |
 |
| I am firmly against smiley-face cannibalism |
 |
| Love those interlocking circles |
 |
| Fun graffiti look :) |
 |
| Trippy cosmic flowers |
 |
| Beehive mesh! |
 |
| Pretty doily-looking flourishy stuff (boy am I articulate today...) |
 |
| Yeah!! |
 |
| Love that top one...Pretty flourishes but you could also make it into splashes. :) |
 |
| Harmless magic mushrooms. :) |
 |
| I wanna rock!! |
As with the other plates in the series, these all stamp very well. No issue, crisp lines, filled solid areas, all where appropriate. No worries here with respect to making these stamp well; I show samples of the stamping in the video if you're interested.
Also as with the other plates in the series, these images are slightly larger than standard Konad-sized images, both in terms of length and width. So you will get a bit more coverage if you have longer nails. Here is a visual comparison:
 |
| Cheeky Jumbo Plate 5 vs. Konad |
These are the same size as the Cheeky Jumbo alphabet series plates, as well.
I purchased my plates with my own money from Amazon.com. When I purchased them, these were $9.49, cheaper if you buy them in their pre-assembled sets. For the price, these absolutely can't be beat; the only question is whether or not you like the images on a particular plate. :)
I hope you've enjoyed looking at this, let me know if you have any questions!
Hugs, love, and megaphones with tongues...
M.
Subscribe to:
Posts (Atom)